
Home Practice after Week 13
Each day is different in pregnancy, not to mention the difference between trimesters. It is common to experience a boost of energy and strength between 16 and 34 weeks. Further down the line, imbalance and heaviness become noticeable and the body changes yet again, so it’s important to change your antenatal yoga practice accordingly.
The first 90 days gave you the gifts of surrender, breath awareness and self-study. You’ll discover that although your physical asana practice is changing dynamically, the inner focus is still of vital importance. It will provide you with a safe anchor, through the moments of low and high energy alike.
So what are the general guidelines for the later stages of your pregnancy?
- Keep listening to your body closely.
- Alternate stronger poses with supported, relaxed ones.
- Move the hips a lot; babies love being rocked and rolled.
- Start a routine of pelvic floor exercises.
Antenatal Yoga Sequence: Trimesters 2 and 3
As with any unsupervised physical activity please be mindful that your safety is ultimately your own responsibility. The first priority is to make sure you feel comfortable doing any of these poses and stop if you don’t.
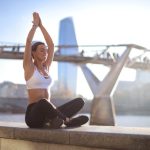
- Start seated on a block or a cushion. Close your eyes and breathe in and out through the nose. Continue for a while, until the rhythm of the breath becomes steady and calm. Place one palm on your belly and another on the heart. Feel the warmth under your palms. With an exhalation, send your love to the baby.
- Still in a cross-legged position, roll your head in a half smile from collarbone to collarbone. Shrug and roll the shoulders down onto your back. Stretch your arms up to the ceiling and to the sides, and exhale them forward. Circle the wrists clockwise and anticlockwise several times. Make fists and spread your fingers. Are your shoulders still lowered? If not shrug them down again. Continue as long as it feels comfortable – three repetitions on each side is a good average.
- Moving to Stick Pose. Still seated on a block with your hips elevated, extend and straighten the legs. Feel the legs resting and supported by the floor beneath you, and take three deep breaths. Do a couple of slow and wide circles with the feet in both directions, and to finish, point and flex the feet several times.
- Bend your knees on top of a cushion, and walk your palms forwards until you reach the All-Fours Pose. Make sure your wrists are under your shoulders. If you have any discomfort in the wrists, rest on the forearms or knuckles instead. Hips should be directly over the knees. Stay here for two breaths and feel the position.
- On your next exhalation, vertebrae by vertebrae, arch the back for a Cat Stretch. Come back to a flat back and gently look up, and repeat this several times. If it feels good, you can extend the position into a Rolling Cat: imagine you are suddenly in a barrel, placed lengthwise onto the floor. The idea is to touch the barrel with your back, right side and left side.
- Come to a stop. Yawn and blow a couple of raspberries.
- Exhale backwards towards your heels, going into the Child’s Pose. Remember to keep the legs wide apart. To make it more restorative, place a block under your forehead or lie down on a bolster.
- Find an empty wall for an Open Angle Pose. Use a cushion to sit comfortably with your back against the wall and place the soles of your feet together. Breathe.
Pain in your pelvic area is a good signal to avoid open-legged poses like this in your home practice. - Stand up and face a wall, about a forearm’s length away for a Calf Stretch. Place your crossed forearms on the wall and rest the head on your wrists. Step forward with the right leg so that your first two toes touch the wall. Now, bend your knee until you feel a stretch in your back leg. Take three deep breaths and repeat twice on each side.
- Pelvis Rocking. Keep the forearms on the wall, step back with both legs. Bend the knees and rock the pelvis as if you were salsa dancing.
- Final Relaxation. Lay on your left side. Snuggle up with cushions and blankets. Go ahead and have a snooze.
See Also: The Basics Of Yin Yoga: A Complete Beginner’s Guide
Just Keep Flowing
So the next time life takes you to a remote island in Greece, worry not. Keep calm and take your yoga wherever life takes you. If you want to explore further, there is a multitude of fabulous yoga poses suitable for pregnancy self-practice that go beyond the capacity of this article. Have a chat with your teacher for recommendations or contact one of my favourite organizations.
Always Keep In Mind
- Listen to the body. The poses should be fairly comfortable. Stop at signs of pain/discomfort.
- Keep flowing out and into the pose. Avoid holding your asanas.
- Alternate strong and restorative poses
- Completely avoid deep twists, postures that engage your abdominals and inversions
- Keep focus on the breath
- Always do a final relaxation
- Don’t forget about your pelvic floor exercises!
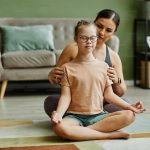
Once you start listening to the body, you will discover that no thinking or Googling is necessary. It will let you know where the tensions are and what needs to be done. This awareness is not the only gift that a regular home practice brings. In pregnancy, it creates a nurturing routine of connecting with the baby that can be naturally transferred into a postnatal period – your mum and baby yoga.