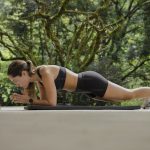
Some students have a tendency to skip through plank pose as they rush on into chaturanga dandasana. But is this fair? Planks can be modified to strengthen shoulders and progressed to build core control. Here’s how to bring planks to life and allow your students to love them as they deserve.
The Power of Plank Pose
Planks in their various forms are beloved by many disciplines, and quite rightly so. A well-executed plank pose is a thing of beauty and builds strength, control and alignment in spades. Whether being used by cross-fitters, pilates disciples, rugby players or yogis, plank in all of its forms have so much to offer.
A vital part of the transition from uttanasana to chaturanga, plank is not always given the attention and technical focus applied to other poses. Frequently novice yogis attempting a high plank have more in common with cobra or a coffee table and, instead of building strength they develop a deep aversion to the pose. Spending time with students perfecting their plank and using it as a vehicle for progressive strengthening in classes provides a wonderful foundation for more advanced work.
Teaching Points for the Perfect Plank
So what do we need to achieve a strong plank?
- Hands — Wrists under shoulders or a little wider for students with tight or muscle bound shoulders. Fingers comfortably spread and all knuckles in contact with the mat allowing firm grounding especially through the thumb side of the hand.
- Elbows — Keep a micro bend here.
- Shoulders — Serratus Anterior is working to protract the scapulae. Cueing students to push though the hands can help achieve this. The rhomboids and the middle section of trapezius will be co-contracting to balance the action of serratus and stabilise the scapula on the chest wall. This provides a strong foundation for the arms.
- Pelvis — In line with shoulders and heels rather than sagging down or riding high.
- Torso — Aim for normal spinal curves from pelvis to head. Chin tucked gently towards chest rather than looking up or down.
- Core — This will contract automatically to achieve good alignment but cueing uddiyana bandha enhances this action and helps to stabilise the pelvis.
- Legs — These should be active with students engaging quadriceps on the front of the thighs
- Feet — Hips width apart and pushing out though heels to help lengthen the body.
I think we often forget that it takes a lot of strength to hold a good plank pose and pushing students to try it before they have sufficient muscle control simply demoralises them and, more worryingly, teaches poor movement patterns.
Any students who are not able to achieve the alignment or whose shoulder blades are lifting from the chest wall when they weight bear on their hands should be encouraged to work with modifications. Allowing them to continue in a poor version of the pose opens them up to injury – shoulder impingements and wrist pain are particularly common in students with poor shoulder strength.
Modification and Preparation
There are so many ways that you can prepare for plank pose – every yoga teacher has their favourites. Here are a few of mine:
- Knees down — Keeping the knees on the floor but adopting all the other alignments in the rest of the body reduces the load on the arms and core. Working to achieve and hold good alignment in this modification is really beneficial.
- Cat and Cow — Encouraging students to push through the hands as they move into cat trains activation of serratus anterior in a very controlled way. This lays the foundation for being able to engage these muscles when more body weight is applied through the hands.
- Superman — Starting on hands and knees, as for cat and cow, then lifting opposite arm and leg before holding them level with the torso for a few breaths helps to strengthen the core. The pelvis should stay level throughout the movement and asking students to imagine they have a tray of drinks on their back raises a smile and focuses attention here.
- Forearm support — Using sphinx arms in a full plank or with knees down increases the stability of the pose and is a useful stepping stone for some students.
- Wider feet — When first coming into the full plank – placing the feet wider than the hips increases the base of support and reduces the load on the body a little. This can be really useful for students who are almost there and need just a little modification.
And if Plank Wasn’t Hard Enough…
And for the more advanced yogi? Try a few of these for your intermediate students.
- Angry cat plank — Once in a full plank, push hard through the hands and lift the spine between the shoulder blades as in angry cat. This really works serratus anterior and is great preparation for hand balances. Aim for 30-60 second holds.
- Pulsing in and out of plank — Slowly moving from plank to down dog and back develops shoulder strength and core control beautifully.
- Knee to chest — From plank, draw one knee towards the chest on an exhale then extend it back on an inhale. The foot can be placed back on the floor or lifted high into three legged dog for an even stronger workout. Repeating this a few times on each side is wonderful for developing core strength.
Sequencing Plank Pose
Plank pose, and all of it’s variations, can be sequenced at any time in a class. I use them as variations in sun salutes and transitions into poses like Pigeon and shalabasana. They sequence well as stand alone flows when pulsing in and out of plank and can really useful to boost flagging energy in a class. You may have guessed that I love plank, but that wasn’t always the case. It has taken a lot of work in modifications and the humility to put my knees down for a long time. It has been so worth it though. Now maybe you would like to take up the challenge and bring your students to love plank like I do. It’s really a nice place to be!

